Virtual IP Camera List & Channels
Overview
The Camera List is the central place where all configured virtual ONVIF IP cameras are displayed and managed.
Each item in the list represents a full ONVIF-compatible IP camera, visible to:
- VMS systems
- NVR devices
- ONVIF discovery tools
- RTSP / RTSPS clients
From here, you can:
- Enable or disable cameras
- Select a camera to manage its channels
- Edit camera settings
- Remove cameras from the system
What Is a Virtual IP Camera?
A Virtual IP Camera in ITVDesk behaves exactly like a physical IP camera:
- Has its own ONVIF service
- Has RTSP / RTSPS streaming endpoints
- Can contain one or multiple video channels
- Can be discovered automatically on the network
The difference is that the video source is software-defined (desktop, webcam, RTSP stream, combined media, etc.).
Camera vs Channel – Key Concept
Understanding the difference between Camera and Channel is essential when working with ITVDesk.
Virtual IP Camera
- Appears as one ONVIF device on the network
- Has:
- IP address
- ONVIF port
- RTSP port
- Authentication
- Can contain one or multiple channels
Channel
- Represents one video output
- Has its own:
- Video stream settings
- Audio configuration
- Recording settings
- OSD and overlays
- Each channel maps to:
- One RTSP stream
- One ONVIF media profile
A single camera can expose multiple channels, just like professional multi-sensor IP cameras.
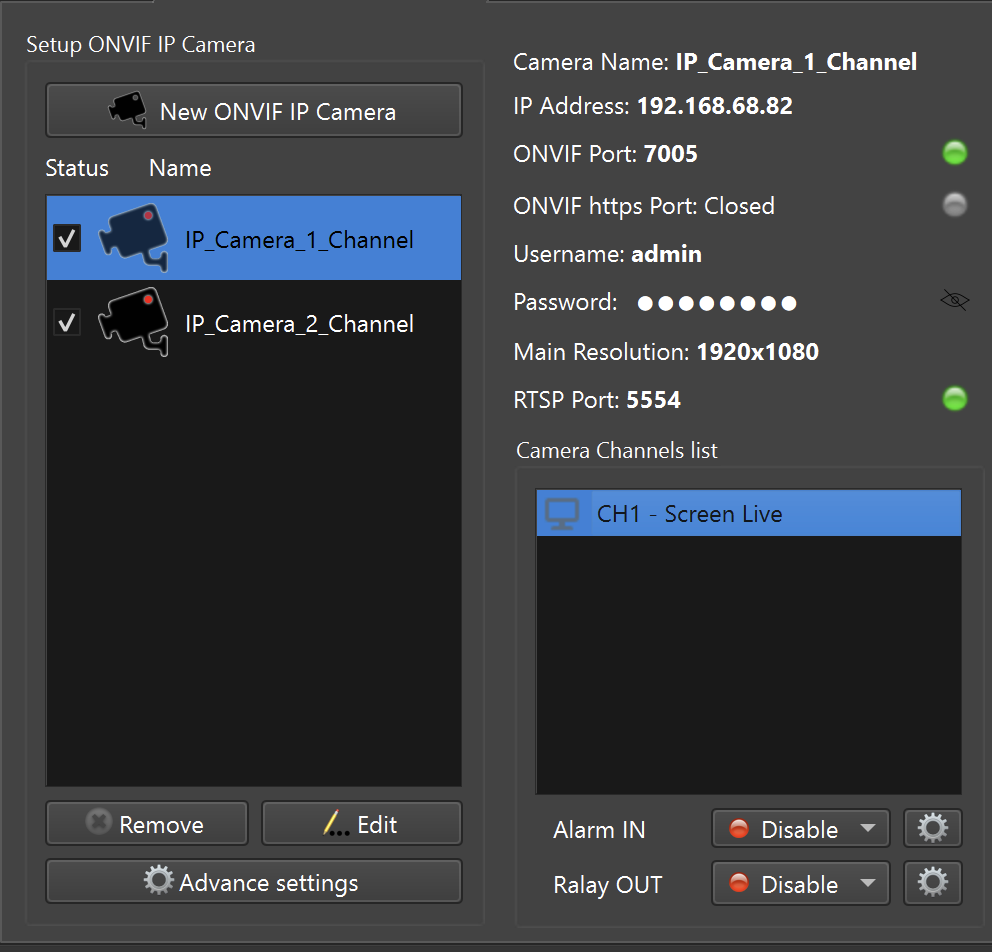
Camera List (Left Panel)
The left panel displays all configured virtual cameras.
For each camera you can see:
- Camera name
- Status (enabled / disabled)
- Icon indicating camera type
Available actions:
- Enable / Disable – Start or stop camera services
- Edit – Modify camera configuration
- Remove – Permanently delete the camera
- Advanced Settings – Network, security, and service options
Disabling a camera immediately stops:
- ONVIF services
- RTSP streaming
- Recording (if enabled)
Camera Context Menu
Right-click any camera in the Camera List to open the context menu.
Common options include:
- Start / Stop camera runtime
- Edit camera settings
- Test selected camera
- Scan network cameras
- Device information and time settings
- Connected clients (quick view + security actions)
- Duplicate camera (single or multiple copies)
- Transfer IPCam (export/import)
- Bulk actions (select all / remove all)
Scan Network Cameras
Scan Network Cameras... opens the built-in advisor tool that discovers ONVIF
devices on the network and provides quick readiness hints.
Connected Clients
Connected Clients shows a live list of currently connected RTSP clients for
the selected camera.
- Displays:
Client Name (IP) - Enabled only when at least one client is connected
- Lets you quickly
Allow,Block, orReconnecta client
See: Connected Clients
Duplicate Camera
Duplicate Camera creates a copy of the selected virtual camera configuration.
Typical use cases:
- Quick testing with multiple similar cameras
- Demo setups (same source, different ports)
ITVDesk automatically assigns the next free ONVIF HTTP/HTTPS ports on the same IP address for each duplicate.
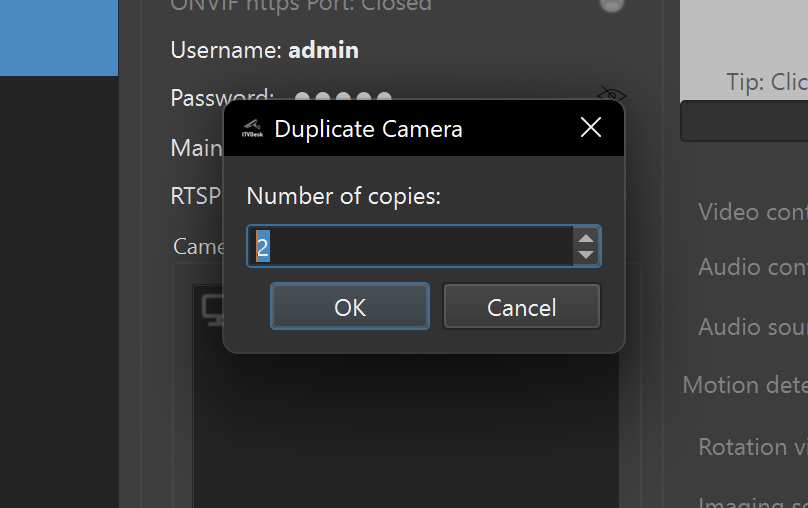
Duplicate Camera xN...
Duplicate Camera xN... creates multiple copies in one step.
This is useful when you need many cameras quickly (e.g. stress/performance testing in a VMS/NVR).
Transfer IPCam (Export / Import)
Transfer IPCam lets you move camera configuration between machines or keep a
backup.
Export IPCam...: export the selected cameraExport All IPCams...: export all camerasImport IPCam...: import a previously exported camera
Remove / Remove All
Remove Camera: deletes the selected camera from the local listRemove All Cameras: deletes all cameras from the local list
Tip: Right-click on empty space in the camera list to access bulk actions like
Select All Cameras and Remove All Cameras.
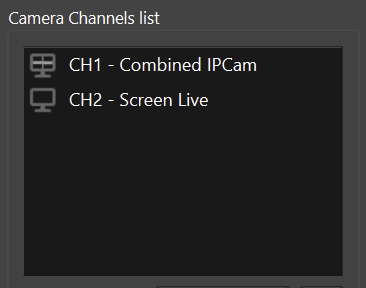
Channel List (Center Panel)
When a camera is selected, the Channel List shows all video channels belonging to that camera.
Each channel corresponds to:
- One media source
- One RTSP stream
- One ONVIF media profile
Examples of channels:
- CH1 – Screen Live
- CH2 – Webcam
- CH3 – Combined Media
- CH4 – External IP Camera
Single-Channel Camera Example
If a camera was created with:
- One desktop monitor
Result:
- 1 virtual IP camera
- 1 channel
This is the simplest and most compatible setup.
Multi-Channel Camera Example
If a camera was created with:
- Two monitors
- One webcam
Result:
- 1 virtual IP camera
- 3 channels
This is ideal for VMS/NVR systems that support ONVIF multi-channel devices.
Multiple Cameras Example
If your VMS/NVR does not support multi-channel ONVIF devices, you can create:
- One virtual IP camera per media source
Example:
- Monitor 1 → Camera on port 7000
- Monitor 2 → Camera on port 7001
- Webcam → Camera on port 7002
Each camera:
- Has one channel
- Uses the same IP address
- Uses a different ONVIF port
Channel Selection and Preview
When a channel is selected:
- Live preview is shown (if enabled)
- RTSP URL is displayed
- Stream status indicators are visible
From here you can:
- Open video stream settings
- Configure audio
- Enable recording
- Adjust overlays and detection
All changes apply instantly, without restarting the camera.
Status Indicators
ITVDesk uses visual indicators to show service status:
- 🟢 Green – Service running and accessible
- ⚪ Gray – Service disabled or inactive
- 🔴 Red – Error or unavailable service
This helps quickly identify configuration or network issues.
Best Practices
- Use multi-channel cameras when your VMS supports them
- Use single-channel cameras for maximum compatibility
- Group related sources under one camera when possible
- Use clear and descriptive camera names
- Test RTSP streams after configuration changes
Summary
The Camera List and Channel system allows ITVDesk to:
- Emulate real ONVIF IP cameras
- Support both simple and advanced setups
- Scale from single stream to complex multi-channel systems
- Integrate cleanly with professional VMS and NVR software
This design provides flexibility without sacrificing compatibility.
Next Steps
Continue with:
👉 Video Stream Settings
👉 Audio Stream Settings
👉 Recording and Storage